This post may contain affiliate links. Please read our disclosure policy.
Hello, everyone. I have two recipes for you today. Both pumpkin.
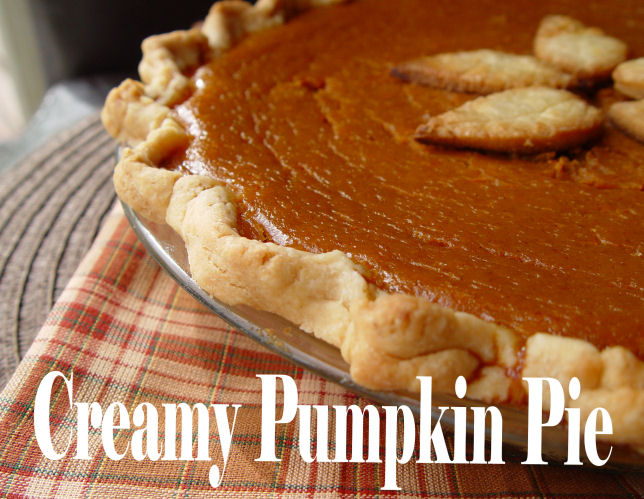
Both Pumpkin Pie, even! This Creamy Pumpkin Pie recipe was given to me by my dear friend Julie. It was given to her, by her lovely mother in law…also named Julie.
Wow. There are a lot of nice ladies around named Julie.
And let me tell you. You won’t find a nicer Julie walking the planet, than these two good lookin’ ladies. (If your name is also Julie….pardon me. I’m sure you are very lovely as well.)
I found this Creamy Pumpkin Pie recipe (from Julie and Julie) to be fabulously tasty. It’s a bit sweeter than the regular pumpkin pie, and has a creamier texture as well. Half of my family preferred it to the Classic Pumpkin Pie that we usually have for Thanksgiving dinner each year.

However, since the Classic Pumpkin Pie (from none other than Libby herself) is still so scrumptious and heavenly and classic after all, I have added this recipe for you as well. (pardon the long sentence there!)
If you are dying to make your own pie crust. Well, then. You should!
I have been dying to make my own pie crust, as well.
I did. Several times in fact.
I have come to this realization.
Homemade Pie Crust and I aren’t really that good of friends. The mixing, and rolling go pretty well….but trying to get that blasted crust into the pie plate without it ripping, and tearing, and especially without me blessing it with a few choice words…..well. It hasn’t happened yet.
I am not giving up, however! When Homemade Pie Crust and I are speaking to each other again, you’ll be the first to know. Trust me. I would love nothing more than to post a beautifully documented Homemade Pie Crust Tutorial, just for you. (and for me….if you have any tips for me, please leave them!)
There is a Pie Crust recipe already on this site. (Given to me from none other than Julie and Julie.) I made some wonderful Lemon Cream Cheese Tarts out of it last Spring. (Getting the crust into a 9 inch pie plate is not required….) The crust has a really great taste! You can access the recipe here.
And now for a little Pumpkin Pie. There are also some short, easy directions for making these little leaf decorations, at the end of the post. Enjoy!

Creamy Pumpkin Pie
Yield: One 9 inch pie
Time: 10 min. prep (if using purchased crust) + 60 min. baking
Recipe from Julie Thomson and Julie Thomson 🙂
1 9 in. unbaked pastry crust
1 C sugar
1 rounded T flour
1 t cinnamon
1/2 t ginger
2 eggs yolks
1 15 oz can pumpkin
1 C milk
1 t vanilla
pinch salt
2 T melted butter
2 egg whites
1. Mix all ingredients, but the egg whites together in a medium sized mixing bowl.
2. Whip the egg whites until they form soft peaks. Then fold in them into the pumpkin batter.
3. Pour the filling into your unbaked pastry shell.
4. Bake at 425 for 15 minutes. Turn the oven down to 350 and bake for 45-60 minutes. Just keep watching it carefully, now. You don’t want the crust to burn, but you DO want the filling to get all cooked. Stick a toothpick into the center…when it comes out clean you are good to go.
5. Cool on a wire rack.

Classic Pumpkin Pie
Yield: Two 9 inch Pies
Time: 10 min. prep (with store purchased crust) + 60 minutes baking
Recipe from Libby’s Pumpkin
2 9 inch unbaked pastry crusts
1 1/2 C sugar
1 t salt
2 t cinnamon
1 t ginger
1/2 t cloves
4 eggs
1 29 oz can Libby’s Pumpkin
2 12 oz cans evaporated milk
1. Mix sugar, cinnamon, ginger and coves in a small bowl.
2. In a large mixing bowl, beat your eggs.
3. Stir the pumpkin into the eggs.
4. Add the sugar/spice mixture to the pumpkin.
5. Gradually stir in the evaporated milk.
6. Pour the whole concoction into the unbaked pie crusts.
7. Bake at 425 for 15 minutes. Turn that baby down to 350 and bake for 40-50 more minutes, or until a toothpick stuck into the center comes out clean.
8. Cool on a wire rack.
Leaf Decorations
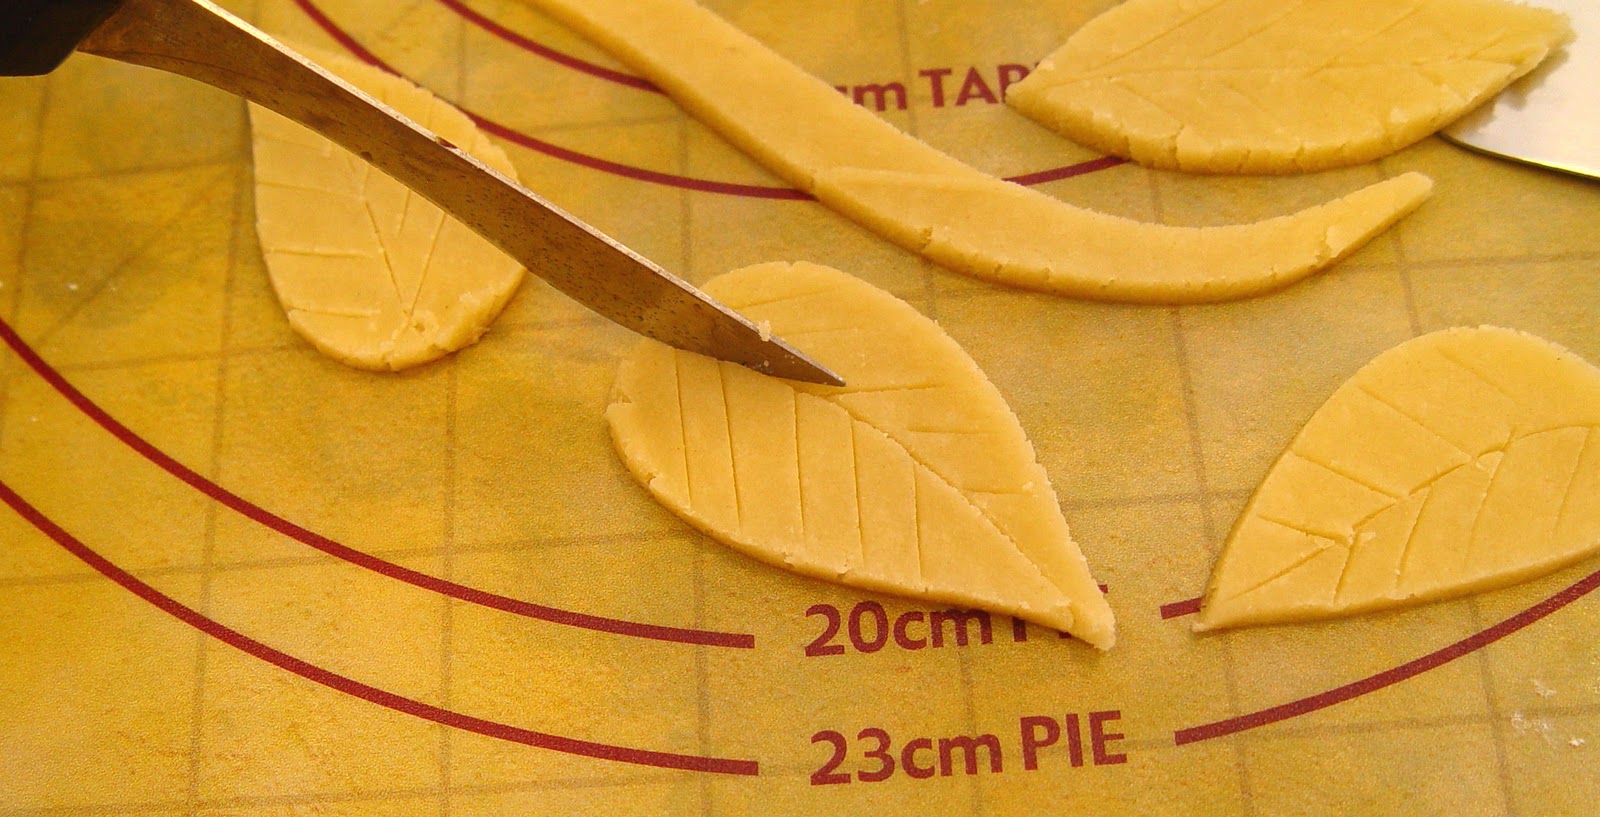
To make these little leaf decorations, simply cut the leaf shapes into the crust with a sharp knife, or cookie cutter. Remove the excess crust from around the leaf shapes.
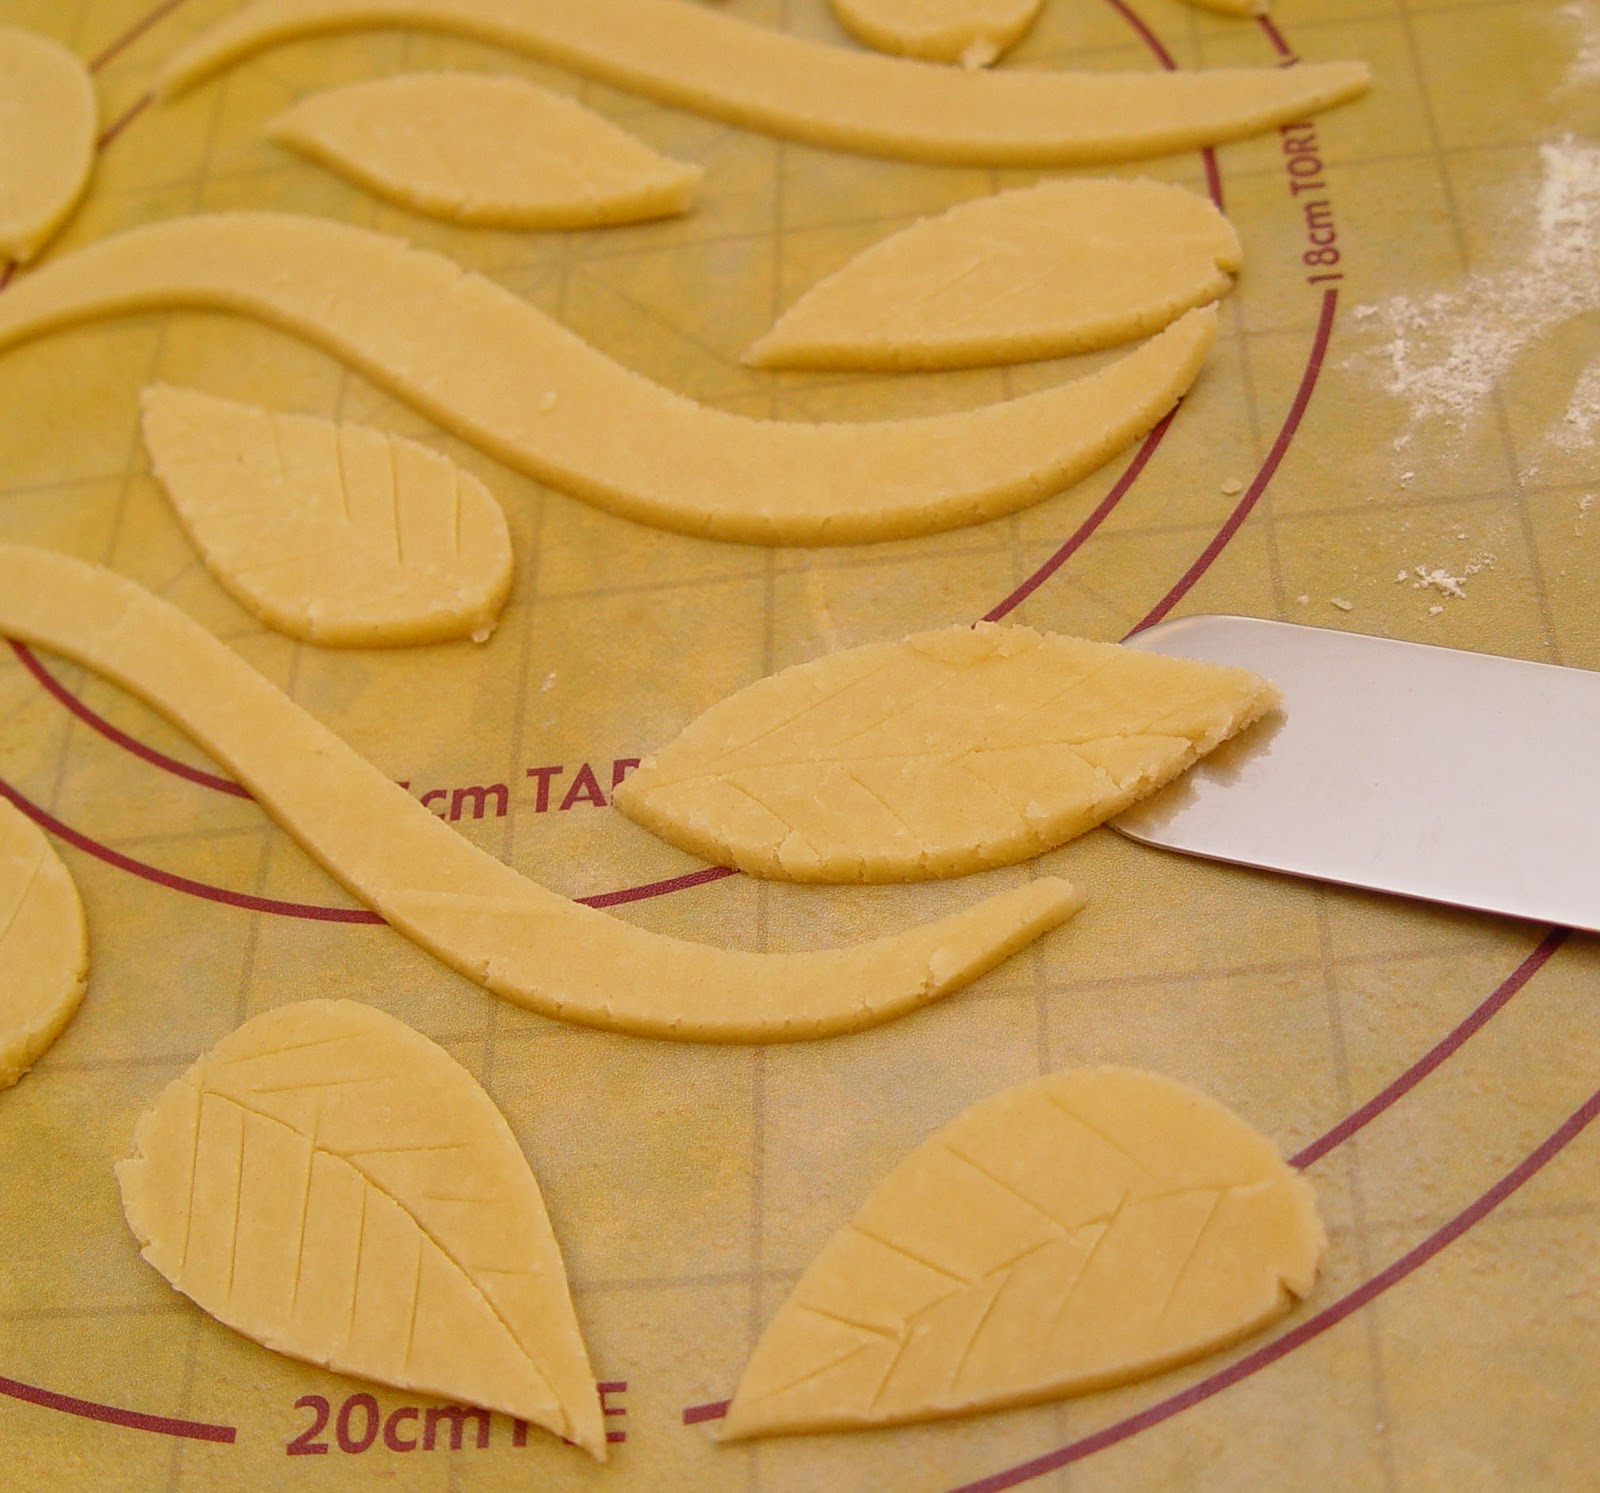
Move them carefully onto a cookie sheet and bake at 425 for 5-7 minutes. Watch them closely, they tend to burn easily. Let them cool on a wire rack, and then place on your pie. Have fun!


That's look so delicious!!
Hi Peter, yes the homestyle rpciee will fill a 9 inch pie. Please let me know if you have any other questions or want to chat about rpciees! Warm wishes,Farmer’s Market Family
I’ve never had trouble rolling the sheet of pie crust dough around my rolling pin – it takes the stress off the crust when you’re moving it to the pie pan and doesn’t tear that way (I also like my pie crust to be just a little thicker because it’s awesome that way and way less fragile! And it makes a great decorative edge that way too). The Saran wrap method works surprisingly well too if you want to avoid putting additional flour in the dough – try it sometime! You can literally sling the thing around the kitchen while it’s held between 2 sheets of plastic wrap! Go girl, go! And thanks for all the awesome recipes! 🙂
Does the creamy recipe take longer to bake? I saw on another website for their classic pumpkin pie to bake at 425 for 15 minutes and then 350 degrees for 35-40 minutes. But on your classic recipe the last part of the baking time is 40-50 minutes at 350. I dont want to overbake and burn it I guess I should just really watch it good at keep checking at the 35 minute mark.
Hey Jamie! Merry Christmas! Just wanted to let you know that in the print version of your creamy pumpkin pie recipe, the line “Whip the egg whites until they form soft peaks.” is missing from the directions. Love this pie by the way – so glad you posted it. It’s my go-to pumpkin pie recipe every fall and winter!