This post may contain affiliate links. Please read our disclosure policy.
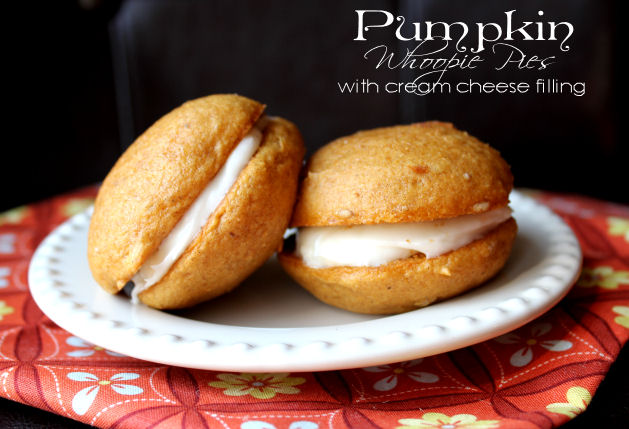
Let’s talk Pumpkin. I have been itching to bake with the tasty stuff for a while now. These Pumpkin Whoopie pies did not disappoint. They taste a lot like the infamous Pumpkin Roll, without all of the fuss. If you haven’t ever had the pleasure of eating a whoppie pie, you are in for a real treat. Whoopie pies are soft cake like cookies that sandwich a fluffy filling. Kind of like a cupcake in a cookie form, if you will. Hope you try them, hope you love them!


1. Turn your oven to 350 degrees and find yourself a nice can of pumpkin. You will need the small 15 ounce can. Toss it into your stand mixer, or large mixing bowl. Add 10 tablespoons softened butter and mix the two together until well combined. 3 minutes should do the trick.

2. To your mixer add two spice cake mixes, you may want to sift these ingredients as they go into the mixer. Sometimes, depending on how long they have been on the shelf, the contents of the box can get a bit clumpy.
3. Add 4 eggs, 1 cup of milk and 1 teaspoon vanilla. Mix until well combined.

4. Drop the batter onto a cookie sheet you have sprayed with cooking spray. You want about 1 1/2 tablespoons of batter per cookie.

5. Bake the cookies for 8 minutes, or until the top springs back if you lightly tap it. Let the pies rest on the hot cookie sheet for a couple of minutes, then transfer them to a wire rack and let them cool completely.

6. Into your stand mixer place 2 packages of cream cheese and 4 tablespoons of softened butter. Beat the two together until it’s nice and smooth, remembering to scrape the bottom of the bowl with a rubber spatula to be sure you get all of the cream cheese evenly incorporated.
7. Add 1 teaspoon vanilla, 4 cups of powdered sugar and 1 T maple syrup. Beat until all is nice and smooth.

8. Frost the underside of a pie with some filling and then place another pie on top.

9. Repeat until all the pies are filled. If you have trouble with them sticking to the parchment, try sprinkling the tops with a bit of powdered sugar.
Serve and enjoy!

Ingredients
- WHOOPIE PIES:
- 1 (15 ounce) can pumpkin
- 10 T butter, softened
- 2 spice cake mixes
- 4 eggs
- 1 C milk
- 1 t vanilla
- CREAM CHEESE FILLING:
- 2 (8 ounce) packages cream cheese, softened
- 4 T butter, softened
- 1 t vanilla
- 4 C powdered sugar
- 1 T maple syrup
- dash salt
Instructions
1. Turn your oven to 350 degrees and find yourself a nice can of pumpkin. You will need the small 15 ounce can. Toss it into your stand mixer, or large mixing bowl. Add 10 tablespoons softened butter and mix the two together until well combined. 3 minutes should do the trick.
2. To your mixer add two spice cake mixes, you may want to sift these ingredients as they go into the mixer. Sometimes, depending on how long they have been on the shelf, the contents of the box can get a bit clumpy.
3. Add 4 eggs, 1 cup of milk and 1 teaspoon vanilla. Mix until well combined.
4. Drop the batter onto a cookie sheet you have sprayed with cooking spray. You want about 1 1/2 tablespoons of batter per cookie.
5. Bake the cookies for 8 minutes, or until the top springs back if you lightly tap it. Let the pies rest on the hot cookie sheet for a couple of minutes, then transfer them to a wire rack and let them cool completely.
6. Into your stand mixer place 2 packages of cream cheese and 4 tablespoons of softened butter. Beat the two together until it's nice and smooth, remembering to scrape the bottom of the bowl with a rubber spatula to be sure you get all of the cream cheese evenly incorporated.
7. Add 1 teaspoon vanilla, 4 cups of powdered sugar and 1 T maple syrup. Beat until all is nice and smooth.
8. Frost the underside of a pie with some filling and then place another pie on top.
9. Repeat until all the pies are filled. If you have trouble with them sticking to the parchment, try sprinkling the tops with a bit of powdered sugar.
Serve and enjoy!
Notes
NOTE: The whoopie pies should be stored in the refrigerator. I placed mine in a large 9x13 gladware container and placed parchment paper on the bottom of the container. I made two layers of whoopie pies, with a sheet of parchment paper between each layer. This seems to help them not stick to the container, or to each other. They are best served on a plate and eaten with a fork.
Recipe adapted from Better Homes and Gardens


Thanks for the link to your nieces website. I just forwarded it to my daughter who has 2 really cute girls who would look BEAUTIFUL in those hairstyles.
Saw you on TV yesterday. You did a great job!!!
These look yummy. I’ve never made whoopi pies before. But pumpkin….? I’m definitely making them now. How do you recommend storing them? Thanks!
Heidi,
Thanks for your question. I placed mine in a large 9×13 gladware container and placed parchment paper on the bottom of the container. I made two layers of whoopie pies, with a sheet of parchment paper between each layer. This seems to help them not stick to the container, or to each other. Good luck!
~Jamie
I can’t wait to make these for our Personal Progress ‘P’ night as one of our “P” treats!!!! Thanks for the idea. GRRREEEEEAAAATTTT!!!!
I wasn’t a fan of the cupcakes they had a few years back…. Way too sweet for me. But i tried the carort cake mini cupcake and the rocky road cake pop. Both were surprisingly good and not overly sweet. The carort cake didn’t have the typical cream cheese frosting, which threw me off at first… But the lighter frosting actually suited better. And it wasn’t too expensive either… Only $2.50 for both.
I love whoopie pies.. My 12 year old daughter loves having friends come over & making them together. This would be a great recipe for you to share on my link up party “munchin’ on mondays”
Have a great week! (love your blog) I’m your newest follower 🙂
Made these today. Yummmmmmm! My house smells wonderful and these taste fabulous! I could eat the whole batch (although I’m glad I’m sharing them with a bunch of friends tonight). Thanks for the recipe.
Mine were a bit sticky so they stuck to my fingers as I frosted them. They weren’t as pretty but you wouldn’t know it by the taste.
Shauna,
Mine were a little bit sticky, too. It helps to put them on some parchement paper, and sprinkle them with some powdered sugar. So glad they tasted good!
~Jamie