
This post may contain affiliate links. Please read our disclosure policy.
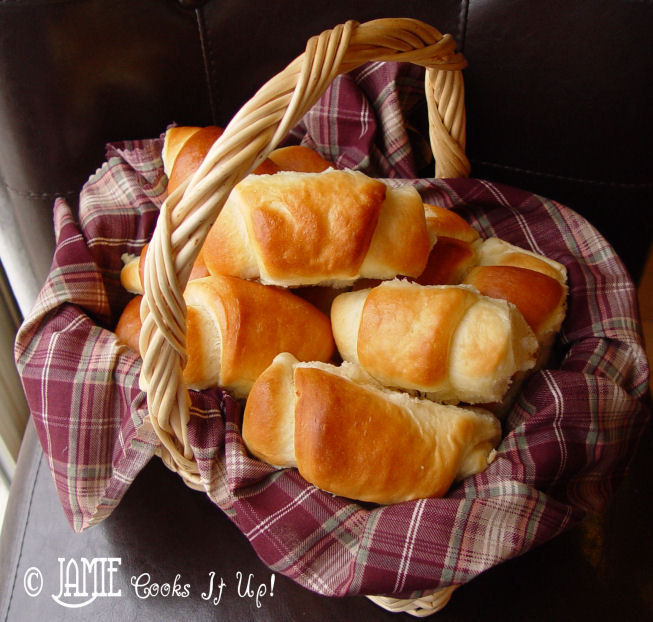
When I was going to the University of Utah I worked at The Lion House. For you out of state-rs, its a wedding reception/banquet dinner kind of joint. They have the most FABULOUS bakery. Fabulous for the pallet, not so fabulous for the hips…if you get my drift. The dinner rolls there are pretty much to die for. This crescent roll recipe is my closest adaptation to The Lion House rolls. I have tried their exact recipe a lot of times, and it just doesn’t turn out the same. So over the years I have adapted the original recipe until it has turned out so divinely delicious I can never eat just one. Hence, the reason I only make them for holidays, and special occasions. This recipe makes 48 good sized crescent shaped rolls. Making them crescent shaped really adds a nice texture.
Lion House Honey Butter is a must for these beauties. The two are a lovely combination. Happy Baking!


1. Place the warm water, yeast and dash of sugar in the bottom of your mixer. Stir it around and let it sit for 5 minutes. It should start to rise and get all bubbly.
2. Add 3 cups of the flour and mix for 30 seconds. You want to add this much flour, before you add the scalded milk and eggs…the hot temperature of the milk would be too much for the yeast, and you don’t want to “cook” your eggs.
3. Add the scalded milk, sugar, salt, softened butter (not the melted butter) and the eggs. Mix for 1 minute.
4. Add the flour 1 C at a time, until the dough scrapes the side of your mixer clean.
5. Mix on high for 8 minutes. This much mixing really improves the texture and elasticity of the dough. I have also noticed, if I don’t mix it long enough the dough doesn’t rise as nicely.
6. Let the dough rise, in the mixer for about 45 minutes, or until doubled in size.

7. Punch the dough down (I just turn the mixer on for about 5 seconds) and divide it into 6 equal parts. Shape each part into a nice round ball and let them rest on the counter top. I always spread a little of the melted butter on the counter top, before I set the dough on it. Let the dough rest for 5 minutes. Letting dough rest for just a bit before it’s shaped makes a HUGE difference when you are trying to shape it. Let’s just say it cooperates better.

8. With a rolling pin, roll each ball into a nice round circle. You want the dough to be about 1/2-3/4 of an inch thick after rolling it out. Pour a bit of butter in the center….I said it was no dieters delight…you see now what I mean.

9. With a pizza cutter, cut the circle into 8 equal triangles. Start from the fat end and roll each triangle up. Place on a large, sprayed cookie sheet.

10. It works best to place them in 3 rows, 8 rolls deep. They like to be about this close together.

11. Place them in a warm 170 degree oven, and let them rise for about 20 minutes. Don’t let them get too tall. Once they start to touch each other, they have risen enough. I have a convection oven, so I can cook both pans at the same time. If yours is a conventional oven (this means it does not have a fan in the back), you will definitely want to cook one pan at a time. Just set one pan on the counter to rise. It will rise more slowly than the pan in the oven, but it will be just the right amount of time to get the other pan cooked and your oven empty and ready for the second pan.
12. Turn your oven up to 350. Leave the rolls in while the oven increases in temperature. (I have had people tell me who own gas ovens that they are better off taking the pans out of the oven while the temp. rises) Bake for about 15 minutes. After about 7 minutes (or when the top pan has gotten a bit golden on the top) I switch the bottom pan to the top, and the top to the bottom.

13. When the rolls are still hot, I brush them all over with more of the melted butter. Delightful! Happy Holiday baking!

Here’s the handy printable…
Holiday Crescent Rolls
NOTE: For those of you attempting this recipe with out a mixer, my hats are off to you! You are home cooking wizard of the century. I also have a few tips. 1- You won't need quite as much flour. 2-You will want to let the dough rise in the bowl 2 times. Punch it down after the first rising period, then let it rise again. Punch it down a second time and you are ready to move ahead with shaping and baking. Thanks to my lovely sisters Erin and Cynthia for these tips...they have been braving this recipe with no mixer. They are deemed home cooking wizards of the century!
Ingredients
- 2 C scalded milk just put it in a bowl, and heat in the microwave for 2 min.
- 1 1/2 C warm water
- 2 T yeast I use Active Dry yeast + a dash of sugar
- 1 T salt
- 1/2 C sugar
- 1 stick butter softened
- 3 eggs
- 10-12 C flour all purpose
- 1 stick butter melted (for shaping the dough)
Instructions
- 1. Place the warm water, yeast and dash of sugar in the bottom of your mixer. Stir it around and let it sit for 5 minutes. It should start to rise and get all bubbly.
- 2. Add 3 cups of the flour and mix for 30 seconds. You want to add this much flour, before you add the scalded milk and eggs...the hot temperature of the milk would be too much for the yeast, and you don't want to "cook" your eggs.
- 3. Add the scalded milk, sugar, salt, softened butter (not the melted butter) and the eggs. Mix for 1 minute.
- 4. Add the flour 1 C at a time, until the dough scrapes the side of your mixer clean.
- 5. Mix on high for 8 minutes. This much mixing really improves the texture and elasticity of the dough. I have also noticed, if I don't mix it long enough the dough doesn't rise as nicely.
- 6. Let the dough rise, in the mixer for about 45 minutes, or until doubled in size.
- 7. Punch the dough down (I just turn the mixer on for about 5 seconds) and divide it into 6 equal parts. Shape each part into a nice round ball and let them rest on the counter top. I always spread a little of the melted butter on the counter top, before I set the dough on it. Let the dough rest for 5 minutes. Letting dough rest for just a bit before it's shaped makes a HUGE difference when you are trying to shape it. Let's just say it cooperates better.
- 8. With a rolling pin, roll each ball into a nice round circle. You want the dough to be about 1/2-3/4 of an inch thick after rolling it out. Pour a bit of butter in the center....I said it was no dieters delight...you see now what I mean.
- 9. With a pizza cutter, cut the circle into 8 equal triangles. Start from the fat end and roll each triangle up. Place on a large, sprayed cookie sheet.
- 10. It works best to place them in 3 rows, 8 rolls deep. They like to be about this close together.
- 11. Place them in a warm 170 degree oven, and let them rise for about 20 minutes. Don't let them get too tall. Once they start to touch each other, they have risen enough. I have a convection oven, so I can cook both pans at the same time. If yours is a conventional oven (this means it does not have a fan in the back), you will definitely want to cook one pan at a time. Just set one pan on the counter to rise. It will rise more slowly than the pan in the oven, but it will be just the right amount of time to get the other pan cooked and your oven empty and ready for the second pan.
- 12. Turn your oven up to 350. Leave the rolls in while the oven increases in temperature. (I have had people tell me who own gas ovens that they are better off taking the pans out of the oven while the temp. rises) Bake for about 15 minutes. After about 7 minutes (or when the top pan has gotten a bit golden on the top) I switch the bottom pan to the top, and the top to the bottom.
- 13. When the rolls are still hot, I brush them all over with more of the melted butter. Delightful! Happy Holiday baking!
Tried this recipe?Let us know how it was!
Recipe from Jamie Cooks It Up!


Hi Melanie,
This particular recipe doesn't freeze very well. Might I direct you to another recipe for rolls? They actually turn out BEST if the dough is frozen first. Here is a link.
https://jamiecooksitup.blogspot.com/2011/11/butterflake-frozen-roll-dough.html
The recipe is called Butterflake Frozen Roll Dough, if you can't get the link to work. Good luck!
~Jamie
Hands down! The best roll recipe I have tried (and I have tried a lot). Thank you! Thank you!
Can these be made the night before and put in the fridge until morning, then pull the pans out and bake?
Hi Shaana,
I haven’t ever tried making them the night before and letting them rise in the fridge. Let me know if you try it and how it works out for you. Good luck!
~Jamie
I don’t usually comment on recipes, but I had to try this one. I have been trying out recipes for great rolls for many years and even went to a Relief Society meeting where one of the bakers for the Lion House came and demonstrated making these rolls, got the cookbooks and have been trying to make them like he did, but to no avail. I decided to try this recipe of yours and it is perfect! Thank you so much for sharing! I love it when it turns out just as you remember them or as they are pictured.
Hi!
Quick question… Do you mean to use a dough hook attachment or a paddle attachment for mixing here? I tend to think for kneading, one would just a dough hook, while for mixing, a paddle… Getting confused with terminologies. (Oh am using a KitchenAid)
Appreciate your enlightenment here pls. Thanks!!
J
Hi Jo,
I usually use a Bosch mixer for this recipe. If you are using a Kitchen Aid you would need the dough hook. Just be ware that it makes a large batch, it may be difficult to manage in a kitchen aid that is smaller than a 6 quart size. Good luck!
~Jamie
Tried doing this in my kitchen aid mixer. The dough kept crawling up my dough hook and was a real mess. Am I doing something wrong?
Amber,
What size is your Kitchen Aid Mixing bowl? This recipe works best in a 6-7 quart or preferably in a Bosch Mixer.
~Jamie
What about a bread maker? I was thinking of trying that to make the dough. Any thoughts?
Tricia,
A bread maker would be much to small to handle this amount of dough. Might I suggest a smaller recipe found here…
https://jamiecooksitup.net/2010/10/fluffy-dinner-rolls/
Good luck to you!
~Jamie
I have ruined every single bread recipe that I have ever tried – this is the very first one that came out perfectly. Thank you for the great recipe and great directions. So excited to make these a staple at my house!
Emily,
Good for you! Thanks for letting me know. 🙂
~Jamie