This post may contain affiliate links. Please read our disclosure policy.
So I have been thinking lately.
“A dangerous past time, I know.”
But, I just can’t help myself.
I’ve been dreaming and scheming and thinking of how I could make some really wonderful dinner rolls,
without taking up 3 hours of time. Yes, I know. An extremely intellectual topic.
There are two roll recipes already on the site that are FABULOUS, if I do say so myself. If you are looking for some knock your socks off crescent rolls that will feed a crowd (the recipe makes 48) then try these
HOLIDAY CRESCENT ROLLS You’ll be the hit of the party with these beauties.
CRACKED WHEAT FEATHER ROLLS are also wonderful. The cracked wheat gives them a great texture. There is a tutorial included in this post on making the rolls into a beautiful rosette shape. They turn out beautiful and delicious. Again, another crowd pleaser.
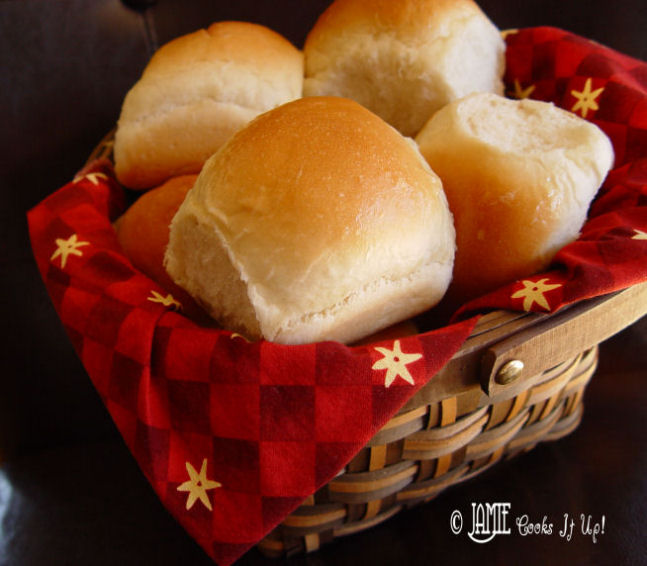
But sometimes, I just want something a little bit faster that still tastes delightfully delicious. And so I have for you these Fluffy Dinner Rolls. The recipe makes one dozen, perfect for a week night dinner. They take just over an hour to make, most of that time being rising in your warm oven, and then baking. So the hands on time is pretty short. Woo Hoo! MyHandsomeHusband said they tasted just as good as my Holiday Crescent Rolls. Hot diggity dog. Put a smile on my face for the rest of the day.


1. Pour your milk into a microwave safe container. These Pyrex glass measuring cups work fabulously. Add your butter to the milk and put it in the microwave for 1 1/2 minutes.

2. Preheat your oven to 170 degrees. While the milk is getting nice and toasty, turn on the tap to get your hot water. Temperature is important to making these rolls rise quickly. If you add cold water, your rolls will are going to rise at a snails pace, and you’ll feel like cursing. We wouldn’t want that kind of thing going on….so please add hot water. I put my hand in the water to test it. You want it to be almost too hot to put your hand in.
3. Put your milk/butter and hot water in the bottom of your Kitchen Aid Mixer. Add the sugar and salt. Then add 2 C of the flour…let it mix for 1 minute.

4. Add the yeast. Turn the mixer on and add the rest of the flour 1 C at a time.

5. You have enough flour when the dough scrapes the side of the bowl clean. Mix on medium speed for 5 minutes.

6. Cover with plastic wrap and let sit for 5 minutes. You need the plastic wrap to trap the heat.

7. Take a bit of butter and coat the inside of a 9×13 pan.

8. Spray your counter, or a cutting board with cooking spray. Lay your dough on top of it.

9. Take a sharp knife, spray it with cooking spray and cut your dough into 12 pieces. Make them as equal as you can….perfection is not necessary. What a relief.

10. Gently round them into balls, and put them in your buttered 9×13 pan.
11. Put the pan into your warm 170 degree oven. Let them rise for about 20 minutes or until they have risen an 1 inch above the rim of the pan.
12. Leave your pan in the oven and turn the heat up to 350 degrees. Bake for 15 minutes. The 15 minutes includes the time it takes the oven to increase in temperature. If your oven takes a long old time….you will of course need to increase the time baking. Bake until golden brown.

13. Brush with a little softened butter.

Ingredients
- 3/4 C milk
- 4 Tb butter
- 3/4 C hot water
- 4 Tb sugar
- 1 tsp salt
- 4 - 4 1/2 C flour
- 1 heaping Tb yeast (I use active dry)
Instructions
1. Pour your milk into a microwave safe container. These Pyrex glass measuring cups work fabulously. Add your butter to the milk and put it in the microwave for 1 1/2 minutes.
2. Preheat your oven to 170 degrees. While the milk is getting nice and toasty, turn on the tap to get your hot water. Temperature is important to making these rolls rise quickly. If you add cold water, your rolls will are going to rise at a snails pace, and you'll feel like cursing. We wouldn't want that kind of thing going on....so please add hot water. I put my hand in the water to test it. You want it to be almost too hot to put your hand in.
3. Put your milk/butter and hot water in the bottom of your Kitchen Aid Mixer. Add the sugar and salt. Then add 2 C of the flour...let it mix for 1 minute.
4. Add the yeast. Turn the mixer on and add the rest of the flour 1 C at a time.
5. You have enough flour when the dough scrapes the side of the bowl clean. Mix on medium speed for 5 minutes.
6. Cover with plastic wrap and let sit for 5 minutes. You need the plastic wrap to trap the heat.
7. Take a bit of butter and coat the inside of a 9x13 pan.
8. Spray your counter, or a cutting board with cooking spray. Lay your dough on top of it.
9. Take a sharp knife, spray it with cooking spray and cut your dough into 12 pieces. Make them as equal as you can....perfection is not necessary. What a relief.
10. Gently round them into balls, and put them in your buttered 9x13 pan.
11. Put the pan into your warm 170 degree oven. Let them rise for about 20 minutes or until they have risen an 1 inch above the rim of the pan.
12. Leave your pan in the oven and turn the heat up to 350 degrees. Bake for 15 minutes. The 15 minutes includes the time it takes the oven to increase in temperature. If your oven takes a long old time....you will of course need to increase the time baking. Bake until golden brown.
12. Leave your pan in the oven and turn the heat up to 350 degrees. Bake for 15 minutes. The 15 minutes includes the time it takes the oven to increase in temperature. If your oven takes a long old time....you will of course need to increase the time baking. Bake until golden brown.
13. Brush with a little softened butter.
Recipe from Jamie Cooks It Up!
I've made these rolls twice and we love them! Thanks for sharing this great recipe!
Hey Jamie. I made these for a recent big family dinner and everybody just loved them. I want to make them for Thanksgiving. I was wondering if these can be prepared and then refrigerated the night before, and if so, at what point of the process? I will have too much going on the morning of Thanksgiving to deal with homemade rolls. But these are the best and I want them on our table. Thanks!
Rhondi,
I'm so glad you loved the rolls!
Here is what I know about this dough. It has a lot of yeast and a lot of hot liquid. If you try and put in the fridge after its made it will rise like crazy…right out of the bowl it's in and make a huge mess. Another option might be to shape the rolls, space them out on a large jelly roll pan and freeze until firm. Then place them in a freezer safe ziploc bag. Take them out the morning of, spray your 9×13 pan with cooking spray, add them to the pan and let them rise. My guess is that it would take about 3 hours for them to rise. Now…beware, I haven't tried this method with this recipe. You might want to give it a try in the next couple of days, just to see. My thoughts are they wouldn't be as good as freshly made….but close. Especially hot from the oven. Trying to make hot rolls from scratch on Thanksgiving Day can definitely be a challenge. Let me know how it goes, if you try it Rhondi. I'd love to hear about it. Good Luck!
~Jamie
Thanks Jamie! I will definitely make a batch this week. Your ideas sound like they will work just fine. I will let you know back. What kind of bread do you normally serve with your Thanksgiving meal?
Hi Rhondi,
My husband and I both come from large families. He is the 2nd of 8 kids and I am the oldest of 6. All of our family members live here in Utah! So whichever side of the family we decide to eat with, there are a lot of people to take assignments. I generally only have a handfull of things I'm assigned to bring, so I usually make a double batch (96 rolls!) of Holiday Crescent Rolls (recipe on the site)the morning of Thanksgiving.
I'm excited to hear how your rolls turn out. Good Luck!
~Jamie
Hey Jamie. I was too scared of the 4 hour rise time it would have taken on Thanksgiving day to try and freeze them. I didn't have a chance to do a test run. What a mistake to make a different recipe from Maratha Stewart's website for no knead rolls…they were very dense and hard on the outside. Your dinner rolls are my favorite and will be on my regular rotation to go with our soups this winter. Thanks for your help though. Hope your Thanksgiving was great! I'm sure your crescent rolls were amazing.
I made these rolls for Thanksgiving and they are great! So simple to make, and my family loved them. These are definitely going on my keeper list. I'll be posting these on my site soon. Thanks for an awesome recipe!
Hi, I'm your newest follower, can't wait to look around!
anne
http://www.anniebakes.net
If I don't have a kitchen aid, do I just knead the dough by hand? I really want to try these for Christmas dinner. I should have asked Santa for a Kitchen Aid!!
Suz,
I will cross my fingers that Santa brings you a Kitchen Aid. That would sure be a great gift.
You can indeed knead this dough by hand. You may need a bit less flour, and I would recommend letting it rise for about 45 minutes before you shape it into balls. Hand kneading requires a longer rising time, than when you mix with a machine. Good luck! Hope they turn out well!
~Jamie