This post may contain affiliate links. Please read our disclosure policy.
So I have been thinking lately.
“A dangerous past time, I know.”
But, I just can’t help myself.
I’ve been dreaming and scheming and thinking of how I could make some really wonderful dinner rolls,
without taking up 3 hours of time. Yes, I know. An extremely intellectual topic.
There are two roll recipes already on the site that are FABULOUS, if I do say so myself. If you are looking for some knock your socks off crescent rolls that will feed a crowd (the recipe makes 48) then try these
HOLIDAY CRESCENT ROLLS You’ll be the hit of the party with these beauties.
CRACKED WHEAT FEATHER ROLLS are also wonderful. The cracked wheat gives them a great texture. There is a tutorial included in this post on making the rolls into a beautiful rosette shape. They turn out beautiful and delicious. Again, another crowd pleaser.
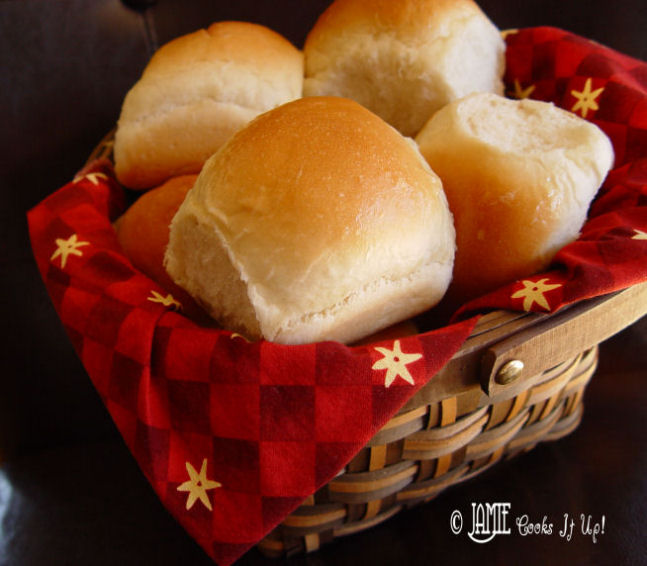
But sometimes, I just want something a little bit faster that still tastes delightfully delicious. And so I have for you these Fluffy Dinner Rolls. The recipe makes one dozen, perfect for a week night dinner. They take just over an hour to make, most of that time being rising in your warm oven, and then baking. So the hands on time is pretty short. Woo Hoo! MyHandsomeHusband said they tasted just as good as my Holiday Crescent Rolls. Hot diggity dog. Put a smile on my face for the rest of the day.


1. Pour your milk into a microwave safe container. These Pyrex glass measuring cups work fabulously. Add your butter to the milk and put it in the microwave for 1 1/2 minutes.

2. Preheat your oven to 170 degrees. While the milk is getting nice and toasty, turn on the tap to get your hot water. Temperature is important to making these rolls rise quickly. If you add cold water, your rolls will are going to rise at a snails pace, and you’ll feel like cursing. We wouldn’t want that kind of thing going on….so please add hot water. I put my hand in the water to test it. You want it to be almost too hot to put your hand in.
3. Put your milk/butter and hot water in the bottom of your Kitchen Aid Mixer. Add the sugar and salt. Then add 2 C of the flour…let it mix for 1 minute.

4. Add the yeast. Turn the mixer on and add the rest of the flour 1 C at a time.

5. You have enough flour when the dough scrapes the side of the bowl clean. Mix on medium speed for 5 minutes.

6. Cover with plastic wrap and let sit for 5 minutes. You need the plastic wrap to trap the heat.

7. Take a bit of butter and coat the inside of a 9×13 pan.

8. Spray your counter, or a cutting board with cooking spray. Lay your dough on top of it.

9. Take a sharp knife, spray it with cooking spray and cut your dough into 12 pieces. Make them as equal as you can….perfection is not necessary. What a relief.

10. Gently round them into balls, and put them in your buttered 9×13 pan.
11. Put the pan into your warm 170 degree oven. Let them rise for about 20 minutes or until they have risen an 1 inch above the rim of the pan.
12. Leave your pan in the oven and turn the heat up to 350 degrees. Bake for 15 minutes. The 15 minutes includes the time it takes the oven to increase in temperature. If your oven takes a long old time….you will of course need to increase the time baking. Bake until golden brown.

13. Brush with a little softened butter.

Ingredients
- 3/4 C milk
- 4 Tb butter
- 3/4 C hot water
- 4 Tb sugar
- 1 tsp salt
- 4 - 4 1/2 C flour
- 1 heaping Tb yeast (I use active dry)
Instructions
1. Pour your milk into a microwave safe container. These Pyrex glass measuring cups work fabulously. Add your butter to the milk and put it in the microwave for 1 1/2 minutes.
2. Preheat your oven to 170 degrees. While the milk is getting nice and toasty, turn on the tap to get your hot water. Temperature is important to making these rolls rise quickly. If you add cold water, your rolls will are going to rise at a snails pace, and you'll feel like cursing. We wouldn't want that kind of thing going on....so please add hot water. I put my hand in the water to test it. You want it to be almost too hot to put your hand in.
3. Put your milk/butter and hot water in the bottom of your Kitchen Aid Mixer. Add the sugar and salt. Then add 2 C of the flour...let it mix for 1 minute.
4. Add the yeast. Turn the mixer on and add the rest of the flour 1 C at a time.
5. You have enough flour when the dough scrapes the side of the bowl clean. Mix on medium speed for 5 minutes.
6. Cover with plastic wrap and let sit for 5 minutes. You need the plastic wrap to trap the heat.
7. Take a bit of butter and coat the inside of a 9x13 pan.
8. Spray your counter, or a cutting board with cooking spray. Lay your dough on top of it.
9. Take a sharp knife, spray it with cooking spray and cut your dough into 12 pieces. Make them as equal as you can....perfection is not necessary. What a relief.
10. Gently round them into balls, and put them in your buttered 9x13 pan.
11. Put the pan into your warm 170 degree oven. Let them rise for about 20 minutes or until they have risen an 1 inch above the rim of the pan.
12. Leave your pan in the oven and turn the heat up to 350 degrees. Bake for 15 minutes. The 15 minutes includes the time it takes the oven to increase in temperature. If your oven takes a long old time....you will of course need to increase the time baking. Bake until golden brown.
12. Leave your pan in the oven and turn the heat up to 350 degrees. Bake for 15 minutes. The 15 minutes includes the time it takes the oven to increase in temperature. If your oven takes a long old time....you will of course need to increase the time baking. Bake until golden brown.
13. Brush with a little softened butter.
Recipe from Jamie Cooks It Up!
I made this recipe this morning and it was an epic fail. I followed the directions so closely. Everything was working well until I tried rising them in the oven. After 15 minutes they had barely rose, so I waited about another hour and they did get a little larger. I finally thought, well I’d better turn it up to the 350 and they were no where near done after 15 minutes, so I ended up going another 15. They looked ok, however they are super dense. Any suggestions as to what I did wrong? Maybe too much flour? I’m thinking that’s what my problem was. Thanks in advance for any suggestions. I did use a metal 13×9 pan not a glass one.
I tried these rolls today and was thrilled with how light and quick they were to make. The best part though was the how they taste! I have made so many roll recipes and this one stands out! Loved them! Loved the easy and quick recipe!
Sandra: May I ask, did you sift your flour? And was it room temp? TIA
My buns did not rise and the yeast which I added after the first two cups of flour did not dissolve into the dough. I had new yeast. Was I supposed to add the yeast to the liquid first?
Thank for your question, Sally. The yeast does go strait into the dough for this recipe. You may have had your oven temperature a bit too high, causing the rolls to not rise.
There are yeasts out there (Red Star in particular) who are labeled “Active Dry Yeast” that are actually not ADY. The Red Star yeast (I buy it at Costco) looks and performs like an Instant Yeast. Instant Yeast looks flat, like it was grated or shaved and is very light. If your yeast is “ball shaped”, it is regular Active Dry Yeast and will need to be proofed in water before using.
My only roll recipe for years now. Love these <3
Thank You for this one container bread recipe. Why didn’t I know of this sooner. Bravo!!!
Can I use plain flour or self-raising flour.
All purpose flour or regular flour 🙂
Crystal,
Thanks for your question. Either kind of flour is great.
Good luck!
~Jamie
Thanks for the recipe. Came out just beautiful.
There is an unspoken rule in my house when my aunt comes to visit from Washington…if she brings me her dark brown bread that is only made up in WA, I will bake her homemade bread and dessert. Okay to be honest even if I did not get my bread in return, me baking bread for her would be a given. Hands down.
This recipe, is my go to recipe for such occassions, and unless I am making a specialty bread – this recipe stands up to the rest and is quite heavenly. Give it a try, you will not be disappointed I promise you!
Hi Jamie,
I read your recipe, took a chance and made your dinner rolls for the first time tonight to celebrate my daughter’s college acceptance. They are fantastic! We now have a roll recipe to use anytime or for special occasions!
Thank you
Joan,
I’m so happy to hear it!
~Jamie
I’m a little confused. Do you leave the oven on 170° while it’s rising the 20 min? Or do you turn it off then turn it on to 350° after the 20 min rise time?